港湾交换机端口镜像设置
作者:易隐者 发布于:2012-5-13 9:29 Sunday 分类:参考资料
flax24端口镜像设置
Harbour(config)#
Harbour(config)# config mirroring 1
add Add ports to mirroring group.
delete Delete ports from mirroring group.
disable Disable current mirroring group.
to Apply port mirroring group.
Harbour(config)# config mirroring 1 add port 5 (source)
Harbour(config)# config mirroring 1 to 13 (target)
Harbour(config)# show mirroring
Port Mirror Configurations:
Mirroring Group 1:
Source Port: 5
Target Port: 13
Harbour(config)# save configuration
港湾6802
!Ethernet port config
interface ethernet 1/11
mirror ingress 1/10 egress 1/10
exit
Extreme alpine 3802
Alpine3804: # enable mirroring to port 2:10
Alpine3804: # configure mirror add port 2:32
Alpine3804: # configure mirror add port 2:1
注意:
比如G产品线的百兆电口在做端口镜像时,如果监控端口与被监控端口不在一个控制器(一组端口)中的话,只能抓到进端口的包,出端口的包抓不到。
μHammer3550-48交换机内部由两块芯片堆叠而成的硬件特点,其中芯片1包括端口1-12、25-36、50,芯片2包括端口13-24、37-48、49,由于mirror不能跨芯片建立,因此建立端口镜像时只能在端口1-12、25-36、50或端口13-24、37-48、49范围内建立。
BigHammer 6808端口镜像
命令 解释
interface ethernet <slot/port > 进入端口配置模式
mirror {[ingress] <portlist >}*1 {[egress] <portlist >}*1 本端口做为镜像的目标端口(mirror to),镜像一组端口的接收(ingress)和镜像另一组端口的发送(egress)
no mirror 设置本端口不做为镜像的目标端口
show 显示端口的配置和状态,包括Mirror的设置
配置案例
在BH-2GBIC10GTX类型的单板在槽位1,将板的1端口设置为镜像目标端口,镜像端口2的接收,端口3的接收和发送,端口4的发送,配置命令如下:
Harbour(config)#interface ethernet 1/1
Harbour(config-if-eth1/1)#mirror ingress 1/2,1/3 egress 1/3-4
取消端口镜像,端口1做为普通端口使用,配置命令如下:
Harbour(config)#interface ethernet 1/1
Harbour(config-if-eth1/1)#no mirror
NetHammerM128
NetHammerM128的八口交换以太网接口中,每一个接口作为一个以太网设备,支持速率模式、双工模式等的配置。
在很多情况下,并不需要将镜像端口的所有收发报文全部捕捉,这是可以通过设定一系列的过滤条件来控制被捕捉的报文,这样可以更有目的的进行分析。交换模块提供的过滤条件有:接收/发送;源MAC地址/目的MAC地址。
相关命令:config mirror
设置端口镜象
例:将端口2、3接收到的目的地址为00:11:22:33:44:55的报文镜象到端口1上:
router(config-if-swi)# config mirror to 1
router(config-if-swi)# config mirror monitor all add 2-3
router(config-if-swi)# config mirror mode all dest 00:11:22:33:44:55
router(config-if-swi)#
标签: 端口镜像 交换机 get monitor mirror 港湾交换机
锐捷交换机端口镜像设置
作者:易隐者 发布于:2012-5-12 17:15 Saturday 分类:参考资料
进入交换机主菜单
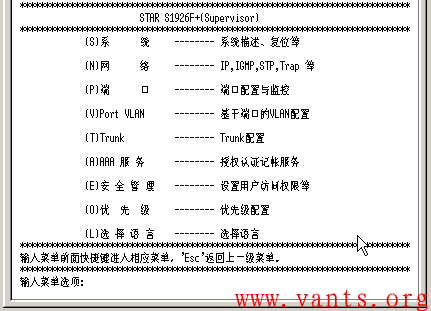
选择(P)进入端口设置界面

选择(C)进入端口配置界面
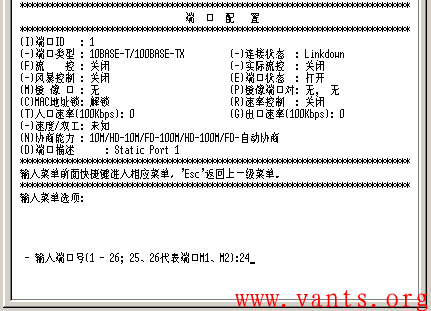
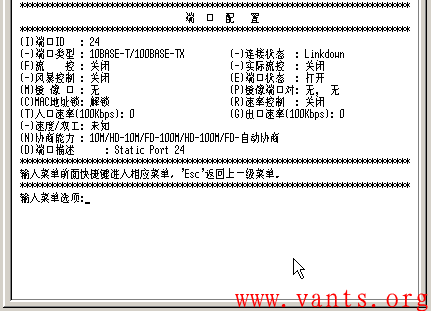
选择(I),进入被监控的端口的设置(实例中被监控端口为24口)
选择(M)进入镜像口的设置界面,选择镜像口(设置为除本身之外的其它端口,在此选择端口1对24口进行监控)
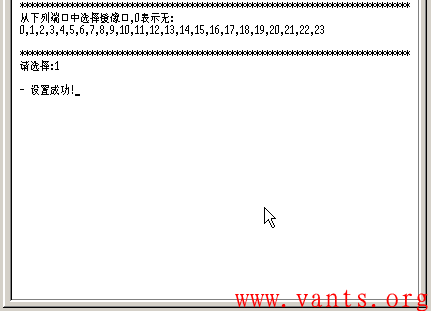
设置成功,保存配置(S)
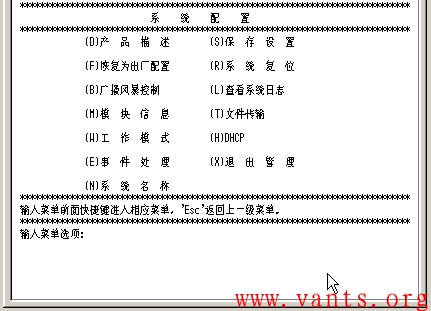
注意事项:在S1926G+中,在同一时刻只可一个端口被设为被监控口,该被监控口允许有1个镜像端口,且监控端口与被监控端口需处在同一VLAN。
锐捷中高端交换机
例:fa0/2接口监控fa0/10接口的步骤如下:
Switch# configure terminal
!进入全局配置模式
Enter configuration commands, one per line. End with CNTL/Z.
Switch(config)# monitor session 1 source interface fastEthernet 0/10 both
!设置被监控口
2006-03-16 17:26:56 @5-CONFIG:Configured from outband
Switch(config)# monitor session 1 destination interface fastEthernet 0/2
!设置监控口
2006-03-16 17:27:19 @5-CONFIG:Configured from outband
Switch# show monitor session 1
!显示配置信息
Session: 1
Source Ports:
Rx Only : None
Tx Only : None
Both : Fa0/10
Destination Ports: Fa0/2
Switch# show running-config
!显示当前所有配置信息
System software version : 1.63 Build Jan 6 2006 Rel
Building configuration...
Current configuration : 472 bytes
!
version 1.0
!
no enable services web-server
hostname Switch
vlan 1
!
enable secret level 1 5 &t>H.Y*TquC,tZ[VrvD+S(\Ws=G1X)sv
enable secret level 15 5 &ttj9=G1qu7R:>H.rvu_;C,ts8U0<D+S
!
interface vlan 1
no shutdown
ip address 192.168.26.38 255.255.255.0
!
ip default-gateway 192.168.26.10
snmp-server community public ro
monitor session 1 destination interface fastEthernet 0/2
monitor session 1 source interface fastEthernet 0/10 both
end
例:创建一个SPAN会话并指定监控口和被监控口
1步骤
configure terminal
进入全局配置模式。
2步骤
no monitor session session_number
清除当前配置。
3步骤
monitor session session_number source interface interface-id [| ,-] {both | rx | tx}
指定源端口。对于session_number1,请指定。对于interface-id,请指定相应的接口号。
4步骤
monitor session session_number destination interface interface-id
指定源端口。对于session_number1,请指定。对于interface-id,请指定相应的接口号
5步骤
end
返回特权模式
6步骤
show monitor [session session_number]
确认您的配置
下面这个例子说明了如何创建一个会话:会话。首先,将当前会话的配置清除掉,然后设1MIRROR8置端口的帧到端口。
Show monitor session 特权命令用于确认配置。
Switch(config)# no monitor session 1
Switch(config)# monitor session 1 source interface gigabitEthernet1/1 both
Switch(config)# monitor session 1 destination interface gigabitEthernet 1/8
Switch(config)# end
Switch# show monitor session 1
Session 1
-----------
Souce Ports:
RX Only: None
TX Only: None
Both: Gi 1/1
Destination Ports: Gi 1/8
标签: 端口镜像 交换机 SPAN monitor 锐捷交换机
凯创交换机端口镜像设置
作者:易隐者 发布于:2012-5-12 17:10 Saturday 分类:参考资料
凯创产品在实际工作环境中较为少见,但正因为少见,在遇到时,一旦需要做端口镜像的设置,往往难以找到相关的资料,下面为我个人在网上搜寻的相关资料的总结。
Matrix E1
前面板上的端口每8个端口被分成6组,每各扩展槽上的模块有2组,因此,Matrix E1(1H582-51)最多支持12个端口组。Matrix E1(1H582-25)最多支持5个端口组。
Matrix E1上的端口镜像功能只能在端口组织间完成,组内的端口之间不能做端口镜像。
每个端口组中只有一个port可以成为source port或target port。
支持多对一的端口镜像。
Matrix>set port mirroring {disable | enable | source_port target_port}
— 用于建立端口之间的镜像关系或打开/关闭镜像功能
— Matrix>set port mirroring fe.0.4 fe.0.11
— Matrix>set port mirroring disable
Matrix>clear port mirroring source_port
— 用于清除端口间的镜像关系
— Matrix>clear port mirroring fe.0.4
Ssr8000
SSR Command Line Interface Reference Manual 551
port mirroring
Command
Purpose
Apply port mirroring to one or more target ports on an SSR or to traffic specified by an
ACL profile.
Format
port mirroring monitor-port target-port |target-profile name>
Mode
Configure
Description
The port mirroring command allows you to monitor via a single port the activity of one
or more ports on an SSR or the traffic that is specified by an ACL.
Parameters
monitor-port
The port you will use to monitor activity.
target-port
The port(s) for which you want to monitor activity. You can specify a single port or a
comma-separated list of ports.
target-profile
The name of the ACL that specifies the profile of the traffic that you want to
monitor. The ACL must be a previously created IP ACL. The ACL may contain
either permit or deny keywords. The port mirroring command only looks at the
following ACL rule parameter values: protocol, source IP address, destination IP
address, source port, destination port, and TOS.
标签: 端口镜像 ACL TOS get monitor 凯创交换机
联想交换机端口镜像设置
作者:易隐者 发布于:2012-5-12 17:01 Saturday 分类:参考资料
联想天工系列交换机很多型号是OEM extreme与foundary的,其相关配置其实就是OEM品牌的配置命令,因此各个型号交换机的端口镜像的配置命令差异较大。
iSpirit 3524G/F交换机
Switch# mirror
Mirror Mode: L2
Mirror Port: 8 //监控者的端口
Egress ports_list: 1 //被监控者出口流量的端口
Ingress ports_list: 1 //被监控者入口流量的端口
iSpirit 4504 交换机
以4端口模块为配置实例
Switch# mirror port x/y
//监控者的端口
Switch# mirror egress x/y
//被监控者出口流量的端口
Switch# mirror ingress x/y
//被监控者入口流量的端口
用show mirror 命令进行确认
Switch# show mirror
Mode : L2
mirror Port : 1/4
egressPortList : 1/1-1/2
ingressPortList : 1/1-1/2
iSpirit 4508 交换机
switch# monitor session 1 source 8/1 destination 8/32
注意:
1,系统最多支持32 组端口镜像,即session_id 的取值为1~32。
2,端口镜像功能为系统的监测手段,不能够写到配置文件中保存,并且建议监控任务完成后,将配置monitor session 删除。
3,在一个交换单元上最多只能有一个源端口(source port)和一个目的端口(destinationport),对于fastethernet 端口,1-8、9-16、17-24、25-32 其中每8 个端口位于一个交换单元。
iSprint 6800交换机
1,开启镜像功能:
enable mirroring
2,镜像配置:
configure mirroring add [<mac_address> | vlan <vlan name> {ports <port
number>} | ports <portnumber> {vlan <vlan name>}]
例如:
configure mirroring add ports 1 vlan default
//将默认VLAN的进出流量镜像到端口1上
configure mirroring add ports 3:2 vlan default
//将默认VLAN的进出流量镜像到第三插槽的第2端口上
3,关闭镜像功能:
disable mirroring
iSpirit 8805交换机
在接口模式下使用如下命令:
mirror interface <if-name> direction {both | receive | transmit}
no mirror interface <if-name> direction [receive | transmit]
参数描述:
if-name: 被侦听端口。
both: 侦听指定端口的进出数据流。
receive:侦听指定端口收到的数据流。
transmit:侦听指定端口输出的数据流。
命令描述:
mirror interface命令指定被侦听的端口,用来侦听其它端口的数据流。
no mirror interface 命令取消端口的侦听设置。
举例:
Switch(config-ge1/1)#mirror interface ge1/12 direction receive
Switch(config-ge1/1)#
//用端口ge1/1侦听端口ge1/12的输入数据流
标签: 端口镜像 交换机 monitor mirror 联想交换机 联想天工
惠普HP交换机端口镜像设置
作者:易隐者 发布于:2012-5-12 16:32 Saturday 分类:参考资料
HP交换机各个型号的端口镜像设置基本上差别不大,其他未在本文档中提及的型号可以参考本文档中的配置方式进行配置。
HP2650交换机
1,设置被镜像口
monitor Define either the port is to be monitored or not.
//在接口模式下,使用monitor命令开启被镜像功能,
例如:HP_2650(eth-2)#monitor
2,设置镜像监听口
mirror-port Define the mirror port for diagnostic purposes
//在配置模式下,使用mirror-port命令设置镜像监听口
例如:HP_2650(config)# mirror-port 20
HP1600 4000 8000 交换机
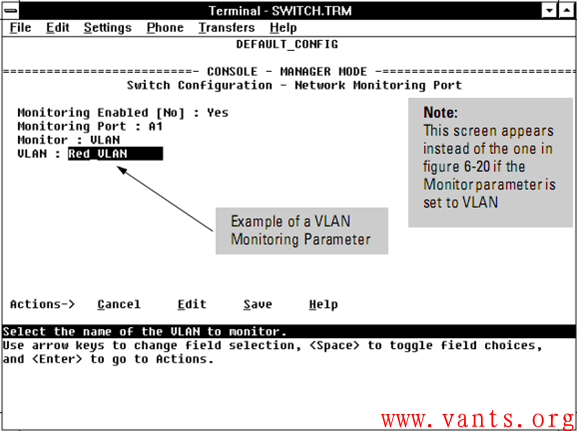
1,在console管理模式下,选择Switch Configuration—Network Monitoring Port进入端口镜像设置界面:
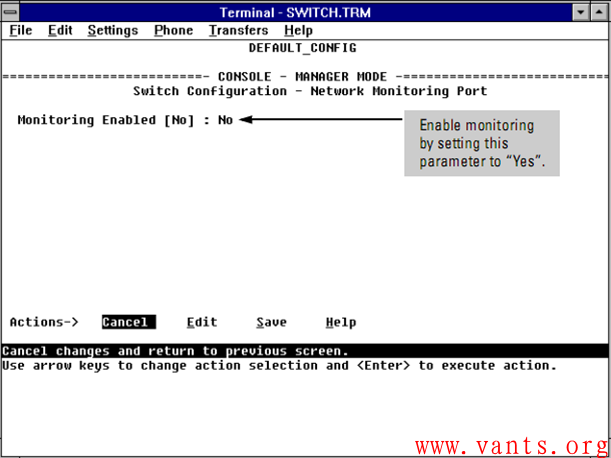
2,根据需要选择监听接口:
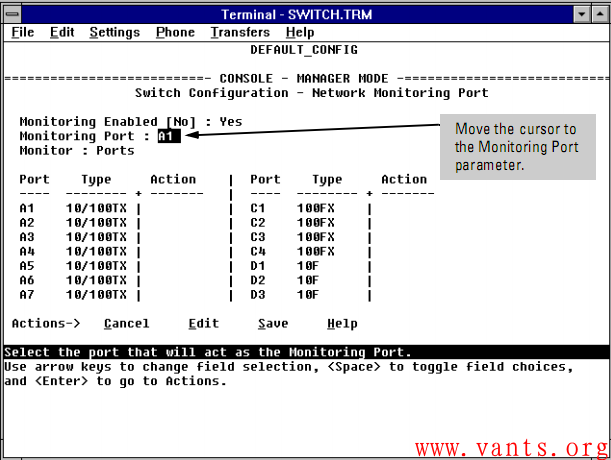
3,根据需要选择被监听的VLAN或端口:
-
QQ邮箱订阅

-
搜索
日历
最新日志
链接
分类

最新碎语
- 如果一个人想要做一件真正忠于自己内心的事情,那么往往只能一个人独自去做"——理查德·耶茨
2019-06-25 21:34
- 日后我们知道,真正的人生道路是由内心决定的。不论我们的道路看上去如此曲折、如此荒谬地背离我们的愿望,它终归还是把我们引到我们看不见的目的地。(茨威格《昨日世界》)
2019-03-16 21:27
- 如果你渴望得到某样东西,你得让它自由,如果它回到你身边,它就是属于你的,如果它不会回来,你就从未拥有过它。——大仲马《基督山伯爵》
2018-10-09 22:07
- 人生有两大悲剧:一个是没有得到你心爱的东西;另一个是得到了你心爱的东西。人生有两大快乐:一个是没有得到你心爱的东西,于是可以寻求和创造;另一个是得到了你心爱的东西,于是可以去品味和体验。——弗洛伊德
2018-09-25 18:06
- 一个人越有思想,发现有个性的人就越多。普通人是看不出人与人之间的差别的——布莱兹·帕斯卡尔
2018-08-30 18:44
存档
- 2020年11月(2)
- 2018年1月(1)
- 2017年12月(1)
- 2017年11月(6)
- 2017年6月(1)
- 2017年5月(1)
- 2017年4月(1)
- 2017年3月(1)
- 2016年11月(1)
- 2016年4月(1)
- 2015年7月(2)
- 2015年6月(1)
- 2015年5月(5)
- 2014年12月(1)
- 2014年11月(1)
- 2014年10月(1)
- 2014年8月(1)
- 2014年7月(1)
- 2014年6月(1)
- 2014年5月(1)
- 2014年4月(3)
- 2014年2月(2)
- 2014年1月(2)
- 2013年12月(1)
- 2013年11月(1)
- 2013年10月(2)
- 2013年9月(1)
- 2013年8月(1)
- 2013年7月(3)
- 2013年6月(2)
- 2013年5月(1)
- 2013年4月(3)
- 2013年3月(1)
- 2013年2月(2)
- 2013年1月(2)
- 2012年12月(11)
- 2012年11月(12)
- 2012年10月(12)
- 2012年9月(26)
- 2012年8月(29)
- 2012年7月(18)
- 2012年6月(2)
- 2012年5月(25)
- 2012年4月(16)
- 2012年3月(13)
- 2012年2月(6)
标签
blogger