IPS在线升级故障分析案例
作者:易隐者 发布于:2012-2-29 20:32 Wednesday 分类:案例讨论
1 故障环境
故障的网络拓扑结构主要如下图所示:

说明:
1,防火墙做NAT,上网行为、IPS都工作在透明模式下,串接在核心互联网出口链路上;
2,防火墙内口地址为192.168.0.3,IPS管理口地址为192.168.0.4,上网行为管理地址为192.168.0.5;
2 故障现象
IPS离线升级包升级正常,但是在线自动升级提示失败,如下图所示:

3 故障分析
3.1 常规分析
IPS地址、网关、DNS设置全部正常,具有访问互联网的权限,将升级失败情况跟厂家沟通,厂家已将IPS升级为最新的版本,并确认升级服务器端都是正常的,暂时无法下结论是否是IPS本身问题导致的。万般无赖之下,我觉得还是先抓包分析一下IPS升级时的数据交互情况。
3.2 数据包分析
当IPS在线升级时,我们在防火墙上通过tcpdump命令抓包,如下所示:
XX酒厂.system% tcpdump -i any host 202.85.219.10 -evv
//这条语句是在防火墙上抓取升级服务器地址的交互报文,并且显示报文的详细信息。
tcpdump: WARNING: Promiscuous mode not supported on the "any" device
tcpdump: listening on any, link-type LINUX_SLL (Linux cooked), capture size 68 bytes
08:15:51.553847 R@eth12 In 00:0b:ab:2a:f5:1d ethertype IPv4 (0x0800), length 76: (tos 0x0, ttl 64, id 28482, offset 0, flags [DF], proto: TCP (6), length: 60)
192.168.0.4.46461 > 202.85.219.10.80: S 2350953923:2350953923(0) win 5840 <mss1460,sackOK,timestamp 69524097[|tcp]>
//这个报文为IPS地址192.168.0.4发往升级服务器的SYN报文,这个报文出现在防火墙内口-eth12口。
08:15:51.553943 X@eth10 Out 00:13:32:06:8c:d4 ethertype IPv4 (0x0800), length 76: (tos 0x0, ttl 63, id 28482, offset 0, flags [DF], proto: TCP (6), length: 60)
xx.242.83.189.46461 > 202.85.219.10.80: S 2350953923:2350953923(0) win 5840 <mss 1460,sackOK,timestamp 69524097[|tcp]>
//防火墙转发了IPS的SYN报文,经外网口NAT后发往服务器,走网通接口地址走的。
08:15:51.577559 R@eth10 In 00:25:9e:83:a3:2f ethertype IPv4 (0x0800), length 80: (tos 0x0, ttl 117, id 29778, offset 0, flags [none], proto: TCP (6), length: 64)
202.85.219.10.80 > xx.242.83.189.46461: S 1891282156:1891282156(0) ack 2350953924 win 16384 <mss 1460,nop,wscale 0,nop,nop,timestamp[|tcp]>
//防火墙外口收到服务器的SYN/ACK报文
202.85.219.10.80 > 192.168.0.4.46461: S 1891282156:1891282156(0) ack 2350953924 win 16384 <mss 1460,nop,wscale 0,nop,nop,timestamp[|tcp]>
//防火墙将上面的报文从外网口的转发至内口,此时升级服务器的TTL为116。
08:15:51.579264 R@eth12 In 00:0b:ab:2a:f5:1d ethertype IPv4 (0x0800), length 68: (tos 0x0, ttl 64, id 28483, offset 0, flags [DF], proto: TCP (6), length: 52)
192.168.0.4.46461 > 202.85.219.10.80: ., cksum 0x1c80 (correct), 1:1(0) ack 1 win 46 <nop,nop,timestamp 69524099 0>
//IPS地址192.168.0.4对服务器的确认报文,至此,IPS与升级服务器三次握手完毕。
08:15:51.579269 X@eth10 Out 00:13:32:06:8c:d4 ethertype IPv4 (0x0800), length 68: (tos 0x0, ttl 63, id 28483, offset 0, flags [DF], proto: TCP (6), length: 52)
xx.242.83.189.46461 > 202.85.219.10.80: ., cksum 0x4e7d (correct), 1:1(0) ack 1 win 46 <nop,nop,timestamp 69524099 0>
//防火墙将上面的报文从内口转发至防火墙外口eth10。
//防火墙内口收到来自服务器IP地址的FIN标志置1的报文。
此处,我们发现几点异常:
1,IPS与升级服务器刚完成TCP三次握手过程,连接刚建立成功,服务器为什么紧接着发送FIN报文,这不符合常规的情况;
2,如果这个报文是来自外网的IPS升级服务器的,那么应该首先出现在防火墙的外网口上,而后再经防火墙转发,出现在防火墙内口上,但是防火墙外口eth10并未出现这个报文,而是直接在防火墙内口eth12口上出现;
3,如果eth12收到防火墙转发的来自升级服务器的报文,eth12应该是转发这个报文给内网的IPS地址,此处的应该显示为X@eth12,而不是R@eth12(R@eth12,R表示eth12口收到报文,X表示接口转发报文);
4,前面已经分析发现升级服务器经过多跳路由后,至防火墙内口时,其IP报文的TTL值应为116,但是此处的TTL值为128;
综合以上疑问,我们可以肯定,这个FIN报文根本不是升级服务器自己发送的,而是来自内网的某个设备伪造的。
是什么设备发送的呢?我们在抓包的时候使用了-e参数,tcpdump会将报文的源MAC地址显示出来,我们可以看到这个伪造报文的源MAC是00:22:46:08:c2:b1
08:18:03.823668 R@eth10 In 00:25:9e:83:a3:2f ethertype IPv4 (0x0800), length 62: (tos 0x0, ttl 117, id 14719, offset 0, flags [none], proto: TCP (6), length: 40)
202.85.219.10.80 > 58.242.83.189.46461: R, cksum 0x6666 (correct), 1:1(0) ack 1 win 0
//132秒后,防火墙外口收到的来自升级服务器的RST报文,此时为升级服务器长时间未收到IPS的升级请求,连接超时发送的RST报文
08:18:03.823673 X@eth12 Out 00:13:32:06:8c:d2 ethertype IPv4 (0x0800), length 62: (tos 0x0, ttl 116, id 14719, offset 0, flags [none], proto: TCP (6), length: 40)
202.85.219.10.80 > 192.168.0.4.46461: R, cksum 0x3469 (correct), 1:1(0) ack 1 win 0
//防火墙将上面的RST报文转发至内口
我们通过防火墙的ARP表,发现00:22:46:08:c2:b1对应的IP为192.168.0.5,如下图所示:
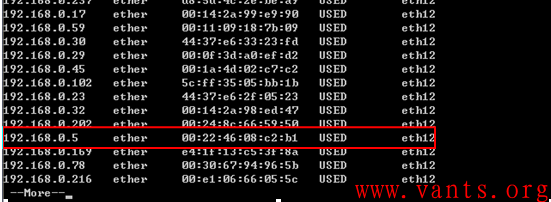
192.168.0.5是上网行为管理设备的IP地址,结合上网行为管理设备的工作原理,我们基本上可以得出结论,是上网行为管理设备发送的伪造报文,导致IPS升级错误。
我们可以通过跳开上网行为管理设备,直接升级IPS来验证我们分析的结论。
4 故障解决
IPS在线升级的故障原因确定清楚了,那么我们解决问题的方式也就出来了,主要有以下几种选择:
1,调整上网行为产品的相关检测策略,让上网行为管理设备完全放行IPS地址对互联网的访问;
2,让IPS升级地址跳过上网行为管理设备,直接访问互联网;
标签: 中间设备劫持 RST reset tcpdump IPS
日志同步功能测试
作者:易隐者 发布于:2012-2-29 18:30 Wednesday 分类:其 他
日志同步功能测试思科ASA防火墙下抓包方法
作者:易隐者 发布于:2012-2-26 17:43 Sunday 分类:参考资料
ASA防火墙抓包示例
capture asa_capture_inside_1 type raw-data access-list tac_capture buffer 10000000 interface inside
capture asa_capture_outside_1 type raw-data access-list tac_capture buffer 10000000 interface outside
no capture asa_capture_inside_1
no capture asa_capture_outside_1
clear capture asa_capture_inside_1
clear capture asa_capture_outside_1
copy /pcap capture:asa_capture_inside_1 tftp://172.16.1.200/asa_inside_capture.cap
copy /pcap capture:asa_capture_outside_1 tftp://172.16.1.200/asa_outside_capture.cap
access-list test permit ip host ip (inside) host ip(outside)
access-list test permit ip host ip (outside) host ip (inside)
capture inside access-list test buffer 10000000 interface inside interface outside
capture outside access-list test buffer 10000000 interface outside interface inside
其他示例
1 ,cisco防火墙troubleshooting之capture packet
首先定义需要抓报的类型,使用acl:
access-list capture permit icmp any any
capture test access-list capture interface outside
这样当有icmp包经过outside接口时,就会被抓取下来
copy /pcap capture: test tftp:
Source capture name [test]?
Address or name of remote host []? 10.10.166.27
Destination filename [test]? test1
这样就会把原始包抓取下来,然后扩展名改为dmp
show capture test
或者通过:https://10.10.166.138/capture/captest/pcap直接可以查看
通过这个地址:https://10.10.166.138/capture/http/pcap来下载
no capture test
删除capture test缓存
在抓取包的时候,如果是TCP,UDP数据包(基于状态)的时候,只有初始数据包处理,后续包直接进入加速处理器,不会被抓到。
例如从一个接口1进入,从2口出来,然后返回数据包从2口进入,从1口出来。这个时候数据包只有1口进的时候才被抓取。而当专区icmp(没有状态)的时候,不管是进还是出都会被抓到,就是说,在1,2口的进出口都会被抓到。
2,思科防火墙与oracle兼容性有问题的抓包过程
配置要抓包的数据流
access-list tac_capture permit ip host 59.42.158.1 host 172.16.99.1
access-list tac_capture permit ip host 172.16.99.1 host 59.42.158.1
capture pix_dmz_capture_1 access-list tac_capture buffer 10000000 interface dmz
capture pix_inside_capture_1 access-list tac_capture buffer 10000000 interface inside
capture tac_dmz_capture intreface dmz
capture tac_inside_capture interface inside
显示一些配置
show clock
show conn local 172.16.99.1
show conn foreign 59.42.158.18
show local-host 172.16.99.1
show local-host 59.42.158.1
show xlate local 172.16.99.1
show xlate global 59.42.158.1
show capture
拷贝capture 到tftp服务器上。
copy capture:pix_dmz_capture_1 tftp://172.16.1.200/pix_dmz_capture.cap pcap
copy capture:pix_inside_capture_1 tftp://172.16.1.200/pix_inside_capture.cap pcap
取消capture
clear capture tac_capture
no capture pix_dmz_capture_1
no capture pix_inside_capture_1
配置要抓包的数据流
access-list tac_capture permit ip host 59.42.158.1 host172.16.99.1
access-list tac_capture permit ip host 172.16.99.1 host 59.42.158.1
capture asa_capture_inside_1 type raw-data access-list tac_capture buffer 10000000 interface inside
capture asa_capture_outside_1 type raw-data access-list tac_capture buffer 10000000 interface outside
capture tac_capture_inside access-list tac_capture interface inside
capture tac_capture_outside access-list tac_capture interface outside
c)
show clock
show conn address 172.16.99.1
show conn address 59.42.158.1
show local-host 172.16.99.1
show local-host 59.42.158.1
show asp drop
show xlate
show capture
d)拷贝capture到tftp服务器上
copy /pcap capture:asa_capture_inside_1 tftp://172.16.1.201/asa_inside_capture.cap
copy /pcap capture:asa_capture_outside_1 tftp://172.16.1.201/asa_outside_capture.cap
e)取消capture
no capture asa_capture_inside_1
no capture asa_capture_outside_1
clear capture asa_capture_inside_1
clear capture asa_capture_outside_1
思科PIX防火墙下抓包方法
作者:易隐者 发布于:2012-2-26 17:42 Sunday 分类:参考资料
命令语法
capture capture_name [type {asp-drop [drop-code] | raw-data | isakmp | webvpn user webvpn-user [url url]}] [access-list access_list_name] [buffer buf_size] [ethernet-type type] [interface interface_name] [packet-length bytes] [circular-buffer][trace trace_count]
在版本6.2中首次出现。
可捕获在ACL中匹配的包。
可用sniffer软件,如Iris,ethereal,sniffer等打开。
保存在内存中,缺省512kb,当buffer满的时候会自动停止。
关键步骤:
在ACL定义感兴趣的数据流。
将ACL应用到目标接口。
示例
1,先设置感兴趣流量的ACL
access-list cisco_test permit ip host 211.91.211.54 host 61.242.223.17
access-list cisco_test permit ip host 61.242.223.17 host 211.91.211.54
2,抓包
capture in_cap interface inside access-list cisco_test
capture out_cap interface outside access-list cisco_test
3,查看数据包
show capture
show capture in_cap detail
show capture out_cap detail
4,保存数据包
https://61.242.X.X/capture/in_cap/pcap
https://61.242.X.X/capture/out_cap/pcap
注意:确保PIX上启用了http server。
另外的示例
capture pix_dmz_capture_1 access-list tac_capture buffer 10000000 interface dmz
//抓取DMZ接口的数据包,抓包缓存为10000000B,抓包范围为ACL tac_capture,抓包保存的文件名为pix_dmz_capture_1。
capture pix_inside_capture_1 access-list tac_capture buffer 10000000 interface inside
//抓取inside接口的数据包,抓包缓存为10000000B,抓包范围为ACL tac_capture,抓包保存的文件名为pix_inside_capture_1。
no capture pix_dmz_capture_1
//删除抓包文件pix_dmz_capture_1
no capture pix_inside_capture_1
//删除抓包文件pix_inside_capture_1
copy capture:pix_dmz_capture_1 tftp://172.16.1.200/pix_dmz_capture.cap pcap
//将抓包文件pix_dmz_capture_1copy到tftp服务器172.16.1.200上。
copy capture:pix_inside_capture_1 tftp://172.16.1.200/pix_inside_capture.cap pcap
Solaris系统下的抓包工具——Snoop
作者:易隐者 发布于:2012-2-16 17:29 Thursday 分类:参考资料
Snoop 的使用需要root权限。Snoop 是Solaris 系统中自带的工具,是一个用于显示网络通讯的程序,它可捕获IP 包并将其显示或保存到指定文件(限超级用户使用snoop)。
Snoop 可将捕获的包以一行的形式加以总结或用多行加以详细的描述(有调用不同的参数–v -V来实现). 在总结方式下(-V ) , 将仅显示最高层的相关协议, 例如一个NFS 包将仅显示NFS 信息, 其低层的RPC, UDP, IP, Ethernet 帧信息将不会显示, 但是当加上相应的参数(-v ), 这些信息都能被显示出来。
参数简介:
[ -a ] # Listen to packets on audio
[ -d device ] # settable to le?, ie?, bf?, tr?
[ -s snaplen ] # Truncate packets
[ -c count ] # Quit after count packets
[ -P ] # Turn OFF promiscuous mode
[ -D ] # Report dropped packets
[ -S ] # Report packet size
[ -i file ] # Read previously captured packets
[ -o file ] # Capture packets in file
[ -n file ] # Load addr-to-name table from file
[ -N ] # Create addr-to-name table
[ -t r|a|d ] # Time: Relative, Absolute or Delta
[ -v ] # Verbose packet display
[ -V ] # Show all summary lines
[ -p first[,last] ] # Select packet(s) to display
[ -x offset[,length] ] # Hex dump from offset for length
[ -C ] # Print packet filter code
由于snoop 的使用非常灵活, 希望能通过下面一些例子的学习来其常见用法。
1. 监听所有以本机为源和目的的包并将其显示出来.
# snoop
2. 监听所有以主机A为源和目的的包并将其显示出来. ( A为主机名, 下同)
- 2 -
# snoop A
3. 监听所有A和B之间的包并将其保存到文件file.
# snoop -o file A B
4. 显示文件file 中指定的包(99-108)
# snoop - i file -p 99,108
99 0.0027 boutique ->; sunroof NFS C GETATTR FH=8E6C
100 0.0046 sunroof ->; boutique NFS R GETATTR OK
101 0.0080 boutique ->; sunroof NFS C RENAME FH=8E6C MTra00192
to .nfs08
102 0.0102 marmot ->; viper NFS C LOOKUP FH=561E screen.r.13.i386
103 0.0072 viper ->; marmot NFS R LOOKUP No such file or directory
104 0.0085 bugbomb ->; sunroof RLOGIN C PORT=1023 h
105 0.0005 kandinsky ->; sparky RSTAT C Get Statistics
106 0.0004 beeblebrox ->; sunroof NFS C GETATTR FH=0307
107 0.0021 sparky ->; kandinsky RSTAT R
108 0.0073 office ->; jeremiah NFS C READ FH=2584 at 40960 for 8192
5. 详细查看文件file 中第101 个包:
# snoop - i file - v -p101
ETHER: ----- Ether Header -----
ETHER:
ETHER: Packet 101 arrived at 16:09:53.59
ETHER: Packet size = 210 bytes
ETHER: Destination = 8:0:20:1:3d:94, Sun
ETHER: Sou5rce = 8:0:69:1:5f:e, Silicon Graphics
ETHER: Ethertype = 0800 (IP)
ETHER:
IP: ----- IP Header -----
IP:
IP: Version = 4, header length = 20 bytes
IP: Type of service = 00
IP: ..0. .... = routine
IP: ...0 .... = normal delay
IP: .... 0... = normal throughput
IP: .... .0.. = normal reliability
IP: Total length = 196 bytes
IP: Identification 19846
IP: Flags = 0X
IP: .0.. .... = may fragment
IP: ..0. .... = more fragments
?
- 3 -
?
6. 查看主机A和主机B之间的NFS 包(命令中的and 和or 为相应的逻辑运
算)
# snoop - i file rpc nfs and A and B
1 0.0000 A ->; B NFS C GETATTR FH=8E6C
2 0.0046 B ->; A NFS R GETATTR OK
3 0.0080 A ->; B NFS C RENAME FH=8E6C MTra00192 to .nfs08
7. 将这些符合条件的包保存到另一文件file2 中:
# snoop - i file -o file2 rpc nfs A B
8. 监听主机A和主机B间所有TCP 80 端口或UDP80端口的包
# snoop A and B and (tcp or udp) and port 80
9. 监听所有的广播包
# snoop broadcast
Using device /dev/hme (promiscuous mode)
10.10.10.50 ->; BROADCAST UDP D=177 S=2541 LEN=35
10.10.10.50 ->; BROADCAST UDP D=177 S=2541 LEN=35
10.10.10.50 ->; BROADCAST UDP D=177 S=2541 LEN=35
10. 监听所有的多播包, 并显示详细内容.
#snoop –v multicast
ETHER: ----- Ether Header -----
ETHER:
ETHER: Packet 1 arrived at 12:33:2.16
ETHER: Packet size = 69 bytes
ETHER: Destination = ff:ff:ff:ff:ff:ff, (broadcast)
ETHER: Source = 0:4:76:46:8f:50,
ETHER: Ethertype = 0800 (IP)
ETHER:
IP: ----- IP Header -----
IP:
IP: Version = 4
IP: Header length = 20 bytes
IP: Type of service = 0x00
IP: xxx. .... = 0 (precedence)
IP: ...0 .... = normal delay
- 4 -
IP: .... 0... = normal throughput
IP: .... .0.. = normal reliability
IP: Total length = 55 bytes
IP: Identification = 14658
IP: Flags = 0x0
IP: .0.. .... = may fragment
IP: ..0. .... = last fragment
IP: Fragment offset = 0 bytes
IP: Time to live = 128 seconds/hops
IP: Protocol = 17 (UDP)
IP: Header checksum = ed38
IP: Source address = 10.10.10.50, 10.10.10.50
IP: Destination address = 255.255.255.255, BROADCAST
IP: No options
IP:
UDP: ----- UDP Header -----
UDP:
UDP: Source port = 2541
UDP: Destination port = 177
UDP: Length = 35
UDP: Checksum = 8E35
UDP:
ETHER: ----- Ether Header -----
ETHER:
ETHER: Packet 2 arrived at 12:33:12.16
ETHER: Packet size = 69 bytes
ETHER: Destination = ff:ff:ff:ff:ff:ff, (broadcast)
ETHER: Source = 0:4:76:46:8f:50,
ETHER: Ethertype = 0800 (IP)
ETHER:
IP: ----- IP Header -----
IP:
IP: Version = 4
IP: Header length = 20 bytes
IP: Type of service = 0x00
IP: xxx. .... = 0 (precedence)
IP: ...0 .... = normal delay
IP: .... 0... = normal throughput
IP: .... .0.. = normal reliability
IP: Total length = 55 bytes
IP: Identification = 14985
IP: Flags = 0x0
IP: .0.. .... = may fragment
IP: ..0. .... = last fragment
IP: Fragment offset = 0 bytes
IP: Time to live = 128 seconds/hops
IP: Protocol = 17 (UDP)
IP: Header checksum = ebf1
IP: Source address = 10.10.10.50, 10.10.10.50
- 5 -
IP: Destination address = 255.255.255.255, BROADCAST
IP: No options
IP:
UDP: ----- UDP Header -----
UDP:
UDP: Source port = 2541
UDP: Destination port = 177
UDP: Length = 35
UDP: Checksum = 8E35
UDP:
11.监听所有的NTP 协议包
# snoop |grep – i NTP
Using device /dev/hme (promiscuous mode)
ts1 ->; 224.0.1.1 NTP broadcast (Tue Jul 23 12:48:50 2002)
ts1 ->; 224.0.1.1 NTP broadcast (Tue Jul 23 12:49:54 2002)
ts1 ->; 224.0.1.1 NTP broadcast (Tue Jul 23 12:50:58 2002)
ts1 ->; 224.0.1.1 NTP broadcast (Tue Jul 23 12:52:02 2002)
ts1 ->; 224.0.1.1 NTP broadcast (Tue Jul 23 12:53:06 2002)
ts1 ->; 224.0.1.1 NTP broadcast (Tue Jul 23 12:54:10 2002)
这里我们也可看到NTP server 每隔约一分钟即向多播地址广播一次.
Snoop抓包命令使用
格式1:
snoop -x 54 -ta tcp port <smsICP监听的端口> from (sp的ip)
例子 带端口抓包)
snoop -x 54 -ta tcp port 7890 host 221.130.45.142 |tee a.log
例子 不带端口抓包)
snoop -x 54 -ta host 211.94.131.202|tee 2005020900.log
snoop -x 54 -ta tcp port 7890 |tee a.log
================================================================
Solaris内置的IP抓包工具 SNOOP
学习TCP/IP协议的朋友,可以使用Solaris中的snoop,Linux中的tcpdump,Windows中的 EtherReal进行抓包分析。
这里,介绍Solaris中的snoop命令。
登陆Solaris shell环境,使用 snoop -c5 ,看看返回了什么?
--------------------------------------------------------------------------------
Using device /dev/bge0 (promiscuous mode)
? -> * ETHER Type=BEBE (Unknown), size = 80 bytes
? -> (multicast) ETHER Type=4009 (Unknown), size = 80 bytes
? -> (multicast) ETHER Type=4009 (Unknown), size = 95 bytes
? -> * ETHER Type=BEBE (Unknown), size = 80 bytes
? -> * ETHER Type=BEBE (Unknown), size = 80 bytes
5 packets captured
--------------------------------------------------------------------------------
返回的时5个IP包的信息。
试试 snoop -c1 -x0,可以返回5个IP包的详细码流。
--------------------------------------------------------------------------------
Using device /dev/bge0 (promiscuous mode)
? -> * ETHER Type=BEBE (Unknown), size = 80 bytes
0: 0003 baa7 070a 0000 baa7 0707 bebe 0100 ................
16: 01e3 2020 202c 2047 534d 425f 6464 6d5f .. , GSMB_ddm_
32: 315f ffff ffff ffff 0000 bbeb f2cd 0806 1_..............
48: 0001 0800 0604 0001 0000 bbeb f2cd 0a64 ...............d
64: 0187 ffff ffff ffff 0a64 01be 0000 0000 .........d......
1 packets captured
--------------------------------------------------------------------------------
试试 snoop -c1 -v,可以返回IP头解析。
--------------------------------------------------------------------------------
Using device /dev/bge0 (promiscuous mode)
-
QQ邮箱订阅

-
搜索
日历
最新日志
链接
分类

最新碎语
- 如果一个人想要做一件真正忠于自己内心的事情,那么往往只能一个人独自去做"——理查德·耶茨
2019-06-25 21:34
- 日后我们知道,真正的人生道路是由内心决定的。不论我们的道路看上去如此曲折、如此荒谬地背离我们的愿望,它终归还是把我们引到我们看不见的目的地。(茨威格《昨日世界》)
2019-03-16 21:27
- 如果你渴望得到某样东西,你得让它自由,如果它回到你身边,它就是属于你的,如果它不会回来,你就从未拥有过它。——大仲马《基督山伯爵》
2018-10-09 22:07
- 人生有两大悲剧:一个是没有得到你心爱的东西;另一个是得到了你心爱的东西。人生有两大快乐:一个是没有得到你心爱的东西,于是可以寻求和创造;另一个是得到了你心爱的东西,于是可以去品味和体验。——弗洛伊德
2018-09-25 18:06
- 一个人越有思想,发现有个性的人就越多。普通人是看不出人与人之间的差别的——布莱兹·帕斯卡尔
2018-08-30 18:44
存档
- 2020年11月(2)
- 2018年1月(1)
- 2017年12月(1)
- 2017年11月(6)
- 2017年6月(1)
- 2017年5月(1)
- 2017年4月(1)
- 2017年3月(1)
- 2016年11月(1)
- 2016年4月(1)
- 2015年7月(2)
- 2015年6月(1)
- 2015年5月(5)
- 2014年12月(1)
- 2014年11月(1)
- 2014年10月(1)
- 2014年8月(1)
- 2014年7月(1)
- 2014年6月(1)
- 2014年5月(1)
- 2014年4月(3)
- 2014年2月(2)
- 2014年1月(2)
- 2013年12月(1)
- 2013年11月(1)
- 2013年10月(2)
- 2013年9月(1)
- 2013年8月(1)
- 2013年7月(3)
- 2013年6月(2)
- 2013年5月(1)
- 2013年4月(3)
- 2013年3月(1)
- 2013年2月(2)
- 2013年1月(2)
- 2012年12月(11)
- 2012年11月(12)
- 2012年10月(12)
- 2012年9月(26)
- 2012年8月(29)
- 2012年7月(18)
- 2012年6月(2)
- 2012年5月(25)
- 2012年4月(16)
- 2012年3月(13)
- 2012年2月(6)
标签
blogger