Juniper IVE设备抓包方法
作者:易隐者 发布于:2012-10-19 10:31 Friday 分类:参考资料
Juniper IVE VPN设备具有自带的抓包功能,在管理员登录上管理平台之后,在IVE设备管理界面的“Maintenance > Troubleshooting > Tools > TCP Dump”中可以看到相关的抓包设置选项,如下图所示:

这里的抓包设置选项都很简单,大家一看基本上都能明白,需要说明的是,这里的“Filter”设置选项,可以使用tcpdump的过滤语句对所需要捕获的报文进行过滤。
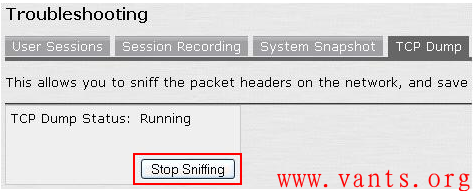
在点击“Start Sniffing”开启“TCP Dump” 抓包,在等待故障出现之后,可再次通过“Maintenance > Troubleshooting > Tools > TCP Dump”界面,点击“Stop Sniffing”,停止抓包,如下图所示:
在停止抓包之后,IVE会将捕获的数据报文保存为一个抓包文件,显示在“Dump file”界面下,如下图所示:
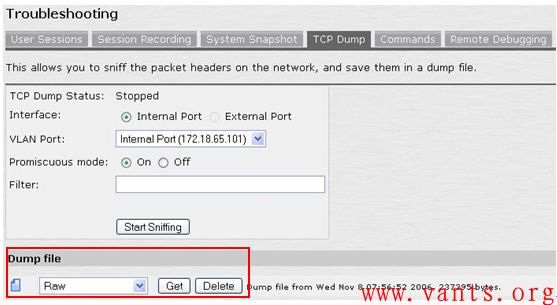
IVE保存的数据包文件提供三种格式文件的下载,分别为:Raw、SSL Dump、Human Readable(一般我们下载默认的“Raw”格式,因为Raw格式可以使用wireshark直接打开分析),我们点击“Get”,下载RAW格式的文件即可。
标签: TCP wireshark tcpdump 故障 抓包 Juniper IVE troubleshooting
Juniper/Netscreen防火墙报文处理流程
作者:易隐者 发布于:2012-6-17 12:16 Sunday 分类:参考资料
Juniper/Netscreen防火墙是在实际环境中非常常见的防火墙品牌,其数据报文处理流程如下图所示:
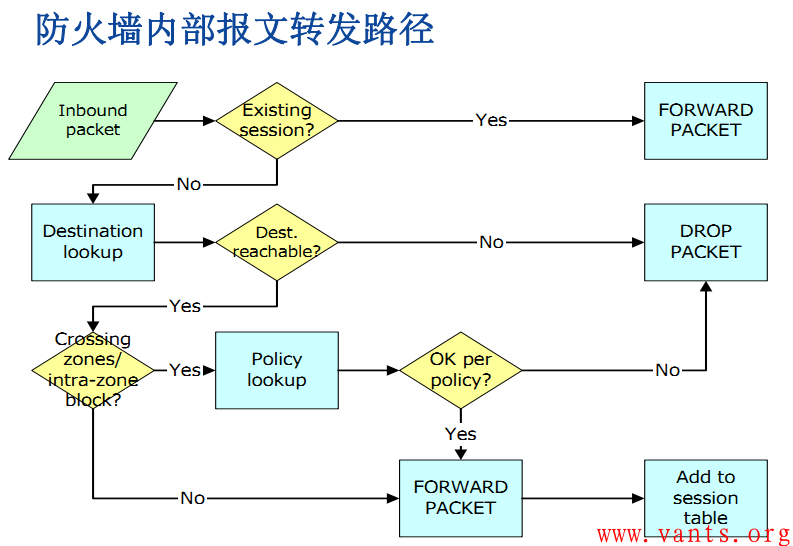
防火墙内部报文转发路径
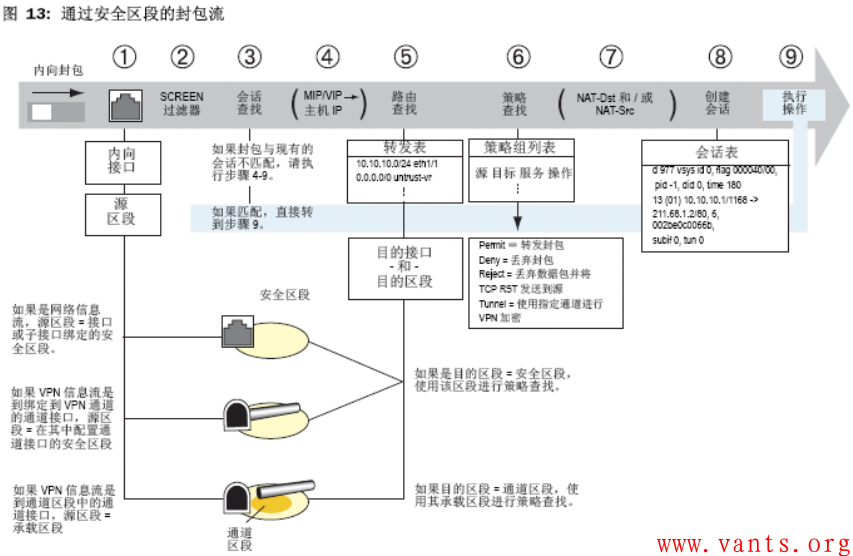
通过安全区域的报文处理流程
标签: 防火墙 firewall 安全 Juniper 报文 报文处理流程 Netscreen
Juniper 交换机端口镜像设置
作者:易隐者 发布于:2012-5-12 17:25 Saturday 分类:参考资料
Juniper M 系列和 T 系列
特点:
●每交换机只能有一个监听端口
●只能镜像 IPv4 的流量
●只能镜像发送(transit only)的流量,不能镜像接收的流量
Juniper M 系列和 T 系列端口镜像配置方法
usen@router# show forwarding-options port- mirroring { input {family inet; rate ; run- length ;} output interface {next-hop
;} no-filter-check;} }
选择将抽样的流量发送到哪个目的端口
user@router# show firewall filter mirror-sample from {...} then {sample; accept;}
定义抽样过滤器,选择感兴趣的流量
user@router# show interface unit 0 family inet filter {input mirror-sample;}
选择将抽样的过滤器应用到某个端口
端口镜像的风险
加重交换机负载,造成设备不稳定
在某些情况下会丢包,不能保证 100% 镜像流量。例如,由于多个源端口镜像到一个目的端口,目的端口无法处理造成丢包
Juniper EX交换机
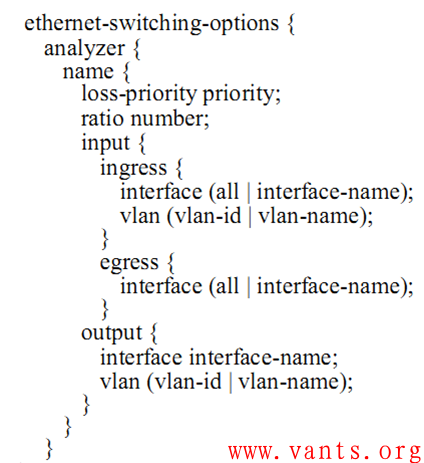
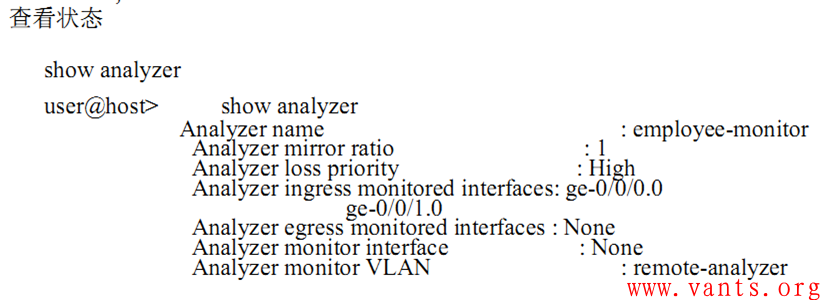
端口镜像是将特定端口的报文复制一份到镜像目的端口,镜像目的端口会与数据监测设备相连,用户利用这些数据监测设备来分析复制到目的端口的报文,进行网络监控和故障排除。 Juniper EX 交换机支持本地端口镜像以及远程端口镜像,同时支持多对一的端口镜像。其中可以支持多个VLAN 镜像到一个VLAN。端口镜像可以通过策略来匹配相应的流量。
配置命令:
标签: 端口镜像 交换机 过滤器 丢包 故障 Juniper Juniper交换机
Juniper防火墙下抓包方法
作者:易隐者 发布于:2012-3-16 17:44 Friday 分类:参考资料
debug flow basic
相对于其他防火墙而言,Juniper防火墙提供许多有效的查错工具,其中之一就是debug flow basic, 应用方式举例如下:
1. 先设置过滤列表,使得防火墙只对需要的数据包进行分析. 即set ffilter命令:
ns208-> set ffilter ?
dst-ip flow filter dst ip
dst-port flow filter dst port
ip-proto flow filter ip proto
src-ip flow filter src ip
src-port flow filter src port
=DBtZ|~4f@
ns208-> set ffilter src-ip 192.168.1.10
filter added
ns208-> get ff
Flow filter based on:
id:0 src ip 192.168.1.10
ns208-> set ffilter src-ip 192.168.1.11
filter added
ns208-> get ff
Flow filter based on:
id:0 src ip 192.168.1.10
id:1 src ip 192.168.1.11
看出来了吗? 设置两次ffilter的结果是两个过滤列表之间是OR的关系. 如果直接设
set ffilter src-ip 192.168.1.11 dst-ip 194.73.82.242 就是AND的关系了.
2. 开启debug
ns208-> debug flow basic
3. 发送测试数据包或让小部分流量穿越防火墙
4. 停止debug
ns208-> undebug all
5. 检查防火墙对所转发的符合过滤条件的数据包的分析结果: }
ns208-> get db stream
****** 12553.0: packet received [60]****** Packet arrived on the eth1 interface tF(UJO xk
ipid = 29503(733f), @d7806910 IP id
packet passed sanity check. I rbyB6. ¬
ethernet1:192.168.1.10/1280->194.73.82.242/512,1(8/0) Src IP, Port, Dst IP, port incl Protocol 1
chose interface ethernet1 as incoming nat if. Int eth1 is placed in NAT mode s<`Nxz@0
search route to (192.168.1.10->194.73.82.242) in vr trust-vr for vsd-0/flag-0/ifp-null Route lookup in trust-vr
route 194.73.82.242->1.1.1.2, to ethernet3 route found to gateway 1.1.1.2 exiting interface int eth3
routed (194.73.82.242, 0.0.0.0) from ethernet1 (ethernet1 in 0) to ethernet3 packet routed
policy search from zone 2-> zone 1 Policy lookup performed from Trust (2) to Untrust (1)
Permitted by policy 3 matched policy ID 3
choose interface ethernet3 as outgoing phy if choose physical interface eth3
no loop on ifp ethernet3. r4Ok(8f6¬D
session application type 0, name None, timeout 60sec session time created as 60 seconds for ICMP
service lookup identified service 0. service lookup performed
existing vector list 1-559ef00.
Session (id:76) created for first pak 1 Create session with ID 76
route to 1.1.1.2 Routed packet to 1.1.1.2
arp entry found for 1.1.1.2 Already had ARP entry for 1.1.1.2
nsp2 wing prepared, ready
cache mac in the session Cached MAC address in the session
flow got session.
flow session id 76
post addr xlation: 1.1.1.1->194.73.82.242. Translate src address to egress interface IP
packet send out to 0010db103041 through ethernet3 Packet sent out on the wire
6. 清除防火墙缓存的debug结果:
ns208-> clear db
7. 清除防火墙的过滤设置
ns208->unset ffilter 0
ns208->get ffilter
Snoop
Snoop 是Juniper防火墙另外一个有效的查错工具,它和debug flow basic的区别是: snoop类似于在防火墙的接口上抓包,可以根据具体接口, 数据包的方向, 协议等等要素进行过滤抓包; debug flow basic则对数据包如何穿越防火墙进行分析,将防火墙的对数据包的处理过程显示出来. Snoop的使用举例如下: 1. 先设置过滤列表,使得防火墙只对需要的数据包进行分析. 即snoop filter命令:
ns208-> snoop filterdelete delete snoop filter >
ethernet snoop specified ethernet
id snoop filter id |
ip snoop ip packet ?YcG
off turn off snoop filter dwjYU\on turn on snoop filter
tcp snoop tcp packet udp snoop udp packet 7
ns208-> snoop filter ip
direction snoop direction
dst-ip snoop filter dst ip dst-port snoop filter dst port
interface interface name
ip-proto snoop filter ip proto a port src or dst port Pv
src-ip snoop filter src ip 1)TEIsrc-port snoop filter src port
IPv4 Address
offset ip offset UqDqF
ns208-> snoop info
Snoop: OFF
Filters Defined: 2, Active Filters 2
Detail: OFF, Detail Display length: 96 EE
Snoop filter based on: id 1(on): IP dir(I) qc
id 2(on): IP dst-ip 172.27.68.1 dir(B) :WdL
RHtx3{S/
2. 开启snoop 进行抓包 YC
ns208-> snoopStart Snoop, type ESC or 'snoop off' to stop, continue? [y]/n y
3. 发送测试数据包或让小部分流量穿越防火墙
4. 停止snoop ns208-> snoop off
5. 检查防火墙对所转发的符合过滤条件的数据包的分析结果(非采用上面的filter,而是采用另外的filter):
ns208-> get db stream 5Y =M <ZEC&NBSP; q#I>m¬u=JJ
1. The packet comes into the Netscreen from the Trusted side client. 55864.0: 0(i):005004bb815f->0010db00ab30/0800 D *MoEd
10.0.0.36->10.10.10.14/1, tlen=60 vhl=45, id=31489, frag=0000, ttl=32
2. The packet then leaves the Netscreen, on it’s way to the destination host. 55864.0: 1(o):0010db00ab31->00104bf3d073/0800 10.10.10.10->10.10.10.14/1, tlen=60 uS
vhl=45, id=31489, frag=0000, ttl=31 r
3. The packet then returns to the Netscreen from the host. &W 55864.0: 1(i):00104bf3d073->0010db00ab31/0800 |_+% 'XtU
10.10.10.14->10.10.10.10/1, tlen=60 |yxLm vhl=45, id=12289, frag=0000, ttl=128
4. Finally, the packet is returned to the client on the trusted side. -
55864.0: 0(o):0010db00ab30->005004bb815f/0800 4 /W|~=y 10.10.10.14->10.0.0.36/1, tlen=60
vhl=45, id=12289, frag=0000, ttl=127 6,19usXw:M
6. 清除防火墙缓存的debug结果:ns208-> clear db W7. 清除防火墙的snoop过滤设置
ns208-> snoop filter delete
All filters removed
-
QQ邮箱订阅

-
搜索
日历
最新日志
链接
分类

最新碎语
- 如果一个人想要做一件真正忠于自己内心的事情,那么往往只能一个人独自去做"——理查德·耶茨
2019-06-25 21:34
- 日后我们知道,真正的人生道路是由内心决定的。不论我们的道路看上去如此曲折、如此荒谬地背离我们的愿望,它终归还是把我们引到我们看不见的目的地。(茨威格《昨日世界》)
2019-03-16 21:27
- 如果你渴望得到某样东西,你得让它自由,如果它回到你身边,它就是属于你的,如果它不会回来,你就从未拥有过它。——大仲马《基督山伯爵》
2018-10-09 22:07
- 人生有两大悲剧:一个是没有得到你心爱的东西;另一个是得到了你心爱的东西。人生有两大快乐:一个是没有得到你心爱的东西,于是可以寻求和创造;另一个是得到了你心爱的东西,于是可以去品味和体验。——弗洛伊德
2018-09-25 18:06
- 一个人越有思想,发现有个性的人就越多。普通人是看不出人与人之间的差别的——布莱兹·帕斯卡尔
2018-08-30 18:44
存档
- 2020年11月(2)
- 2018年1月(1)
- 2017年12月(1)
- 2017年11月(6)
- 2017年6月(1)
- 2017年5月(1)
- 2017年4月(1)
- 2017年3月(1)
- 2016年11月(1)
- 2016年4月(1)
- 2015年7月(2)
- 2015年6月(1)
- 2015年5月(5)
- 2014年12月(1)
- 2014年11月(1)
- 2014年10月(1)
- 2014年8月(1)
- 2014年7月(1)
- 2014年6月(1)
- 2014年5月(1)
- 2014年4月(3)
- 2014年2月(2)
- 2014年1月(2)
- 2013年12月(1)
- 2013年11月(1)
- 2013年10月(2)
- 2013年9月(1)
- 2013年8月(1)
- 2013年7月(3)
- 2013年6月(2)
- 2013年5月(1)
- 2013年4月(3)
- 2013年3月(1)
- 2013年2月(2)
- 2013年1月(2)
- 2012年12月(11)
- 2012年11月(12)
- 2012年10月(12)
- 2012年9月(26)
- 2012年8月(29)
- 2012年7月(18)
- 2012年6月(2)
- 2012年5月(25)
- 2012年4月(16)
- 2012年3月(13)
- 2012年2月(6)
标签
blogger